Thursday, April 6, 2017

Thwart spearphishing attacks by using digital signatures in IBM Notes Mail


In case you aren't inclined to read this post through and through, despite the beauty of its prose, here's the bottom line: Spearphishers cannot easily spoof a digitally signed message; so you should enable default digital signing of messages by all of your users to prevent spearphishing attacks.

Recently a friend told me about a security breach at his company. The breach was a textbook spearphishing attack. A member of the accounting department received an email message that purported to be from the company CEO. In the message, the “CEO” directed the recipient to wire umpteen thousands of dollars to a certain bank account. The email arrived late Friday afternoon and urged the recipient to wire the money “before close of business today”. The CEO was, of course, not around, so could not be reached to verify. The recipient bookkeeper did as directed and the company never saw the money again. 

Even more recently (because it's tax season, I suppose) I read that someone has been very successfully using spearphishing messages to trick companies into sending their employees' W-2 forms to the spearphisher. This spearphisher has succeeded so far in collecting some 120,000 W-2 forms from a number of organizations.

It occurred to me that if the victim companies used IBM Notes Mail they could easily have thwarted these spearphishing attacks.

Phishing attacks in general are a type of social engineering attack in which the attacker blasts a deceptive email out to as many recipients as possible, hoping to trick some of the recipients into responding in a way that will enable the attacker to rip off the respondent in some way.  Spearphishing attacks are phishing attacks aimed at a single recipient. The email (or other attack vector) is finely tuned to trick the recipient into trusting the sender and responding positively. The email typically purports to be from a trusted, authoritative executive within the recipient’s organization; the email may direct the recipient to send money to some bank account and do it immediately because time is of the essence, as in my first example. Or, as in my second example, the goal may be to get the recipient to give away confidential information such as, oh, I don’t know, how about: The W-2 forms of every one of the organization’s employees!

The feature of Notes that could have prevented these spearphishing attacks is digital signing of documents. IBM Notes for decades now has included a feature permitting senders to sign outgoing messages digitally. This is not a “written” signature at the bottom of outgoing messages, but rather an encrypted hash of the message that accompanies the message and enables the recipient to verify that 1) the message really came from the purported sender and 2) the content of the message was not altered en route to the recipient. When the recipient of the message opens it, Notes verifies the integrity of the hash and assures the recipient that the message is genuine. In the message header it displays “This message is digitally signed." In the Status Bar (bottom of the window) it briefly displays "Signed by <sender’s fully distinguished name> on <date> <time>, according to <certifier name>”. 
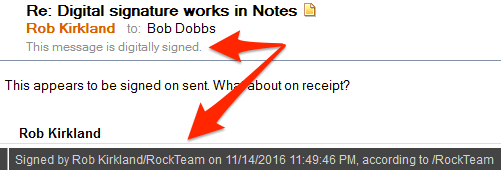

A spearphisher could not easily spoof such a message because to do so he would have to obtain the sender’s private key, which only exists in the sender’s Notes user ID file. The spearphisher would have to obtain a copy of the purported sender’s ID file and learn its password (or, even harder, obtain a certifier ID and learn its password). That is, he would have to compromise both parts of a Notes user’s two-factor security. Not impossible, but not an easy thing for a total and remote stranger to pull off. 

Digital signing of messages has been available in Notes since at least 1993. But it is voluntary by default. Notes users have to check a box to digitally sign any message before sending it. (They can check another box to digitally encrypt the message, too, if they want.) As you might guess, in most organizations hardly anyone ever checks the boxes or has any clue about why they might want to do so. 

What Notes organizations can do (and should do soon, because spearphishers are clearly getting really good at their craft) is enable digital signatures by default, so that messages are digitally signed unless the sender turns off the feature.

First, of course, Notes administrators should notify their users that they will enable this feature.

Before that, though, and most importantly of all, Notes admins should educate their users so that
  • The users become appropriately paranoid about responding to mail that asks them to do potentially problematic things.
  • The users know why digital signing is important.
  • The users know that they should always look for the notice that the message is digitally signed before assuming a message from a purported Notes user is genuine. 
And as I write and think about how serious this spearphishing/ransomware plague is getting, it occurs to me that,  in parallel with educating the users, the Notes admins should get management on board and get HR to pitch in and revise personnel policies to make it clear to everyone in the organization that thou shalt [do certain things] and thou shalt not [do certain other things] with respect to email.
And all of that being said and done, and now that the users know what to expect, what to do, and why it's important, the admins should enable default digital signing of Notes mail. 

Enabling default digital signing of messages is very easy or moderately easy depending on a number of factors. Enabling it is very easy if all of an organization’s mail users use Notes to send and receive mail, and the only mail the organization is concerned about protecting with digital signatures is internal mail. An admin sets a particular field in a policy and applies the policy to the target users. Done.

Enabling default digital signing of messages is moderately easy if users also use Web browsers or non-Notes (POP, IMAP, IMSMO) mail programs or mobile devices to send and receive mail, because you can’t enable default digital signatures in non-Notes clients by policy. Rather, you have to convince users to enable it as a default in their user preferences. (That pretty much means that you really must educate your users in the importance of digital signatures, and not just pay lip service to it.) And you have to make sure that their ID files have either been merged into their mail databases or reside in an ID Vault. (But if your non-Notes mail users' mail resides on IBM cloud-based mail servers, their IDs must reside in the cloud-based ID Vault; merging their ID into their mail database won't be sufficient.)

Finally, if you also want to give users the option to sign messages addressed to recipients whose mail does not reside on Domino servers, the implementation process becomes not so easy at all. I'll be happy to discuss the complications involved in that process if either you or my other reader expresses interest in reading about it. But for now, I'll leave this discussion here:
  • Educate management, HR, and your users about the dangers of spearphishing and how to cope with it.
  • For your Notes mail users, use policies to enable default digital signing of messages to other Notes users.
  • For your non-Notes, Domino-based mail users who have Notes IDs, encourage them strongly to enable the preference to sign outgoing mail by default. And get their Notes IDs merged into their mail databases or an ID Vault.
  • For your non-Notes, Domino-based mail users who do not have Notes IDs, re-register them to generate Notes IDs for them.
  • If you have non-Domino email users (Exchange, O365, Google, whatever), take two aspirin and call me in the morning.

Sunday, October 4, 2015

Jumping over hurdles to upgrade Domino

Here’s what I had to do to the other day to apply Interim Fix 2 to a Domino server running version 9.0.1 Fixpack 4: Shut down Domino, the Domino Controller, the Java Console, NSD, and (wait for it, wait for it) Windows Management Instrumentation. Huh? Apparently WMI or one of its dependent apps grabs onto one or more Domino DLLs and won’t let go. Or some damn thing. One of the dependent apps was VMware Helper. I wonder if that was the culprit.  I remember running into a similar problem years ago upgrading Domino on a Xen VM. That might explain why one only sees problems like this occasionally (when least welcome, of course).
Anyway, until I stopped the WMI service, I kept getting this error when I tried to apply IF2:  “Notes/Domino related process is still running”. Thanks to Rainer Brandl for that tip.
This morning, I tried the same thing on another Domino server and it didn’t work. Same error message. More research. Thanks to Daniel Nashed for the following workaround:
Set Domino and NSD to Manual in Windows Services, rename the Domino directory, restart Windows, rename the Domino directory back to original, apply the patch, reset the services to automatic, restart NSD and Domino. 
Daniel didn’t actually say anything about resetting the Windows services. That was my own “belt-and-suspenders” add-on. Don’t know if it was really necessary. But I got past the error message. Finally. 
But IF2 still wouldn’t install because blah blah blah. Look at the UPGRADE.LOG. Wrong version of something in the Domino directory. I suspected I may have failed to notice if IF1 was installed on this server. So I ran the IF1 installer, which offered to uninstall IF1, and then did so. Then I succeeded, finally, in installing IF2. 
Had that not worked, I might have tried these other things: 
  • Run the Fixpack 4 installer. See what it says. Depending on what it says, maybe uninstall/reinstall it, then try to install IF2 again.
  • Run the 9.0.1 installer in Repair mode. Then reinstall FP4 and IF2.
  • Uninstall 9.0.1, strip everything from the Program directory, reinstall all.
Luckily I didn’t have to get that radical. 
I love working on Sunday mornings.

Friday, September 19, 2014

Benefits of SmartCloud: The Network Effect

An interesting aspect of IBM Connections Cloud (formerly known as IBM SmartCloud for Social Business) is that all organizations that participate in it belong to a single directory. That fact has some useful implications. In particular it means that, if they want to, Connections Cloud users can interact, within Connections Cloud, with other Connections Cloud users outside their own organization. Here's an example of what I mean:

My organization, Rockteam, is an IBM Business Partner providing software and hardware services for a number of IBM customers. Years ago Rockteam migrated our mail to Connections Cloud (back when it was branded LotusLive), and later we subscribed to the features known until recently as IBM SmartCloud Connections (now known as IBM Connections Social Cloud), IBM SmartCloud Meetings (now IBM Connections Meetings Cloud), and IBM SmartCloud Docs (now IBM Connections Docs Cloud) in order to maximally leverage Connections Cloud's benefits. My own role at Rockteam is to help our clients install, configure, and maintain a variety of IBM's server products. I also help my customers (and other IBM Business Partners) to join and migrate their mail to IBM Connections Cloud themselves and to find the best ways to maximize its benefits for their organizations. In other words, I develop relationships; and IBM Connections Cloud can strengthen these relationships.

A nice thing about using Connections Cloud for mail is that Sametime Instant Messaging is included with it. What's really nice about that is that, not only can you chat with the other Connections Cloud mail users in your own organization, but you can also chat with any other Connections Cloud mail user in any other organization. For me that provides two benefits:
  1. I can chat up IBM experts when I need to.
  2. My customers can chat me up when they need to.
How does that work? Well, a few weeks ago I wrote in this very post a detailed description of a procedure for enabling SmartCloud users outside my SmartCloud organization to see my SmartCloud Profile. From there I described how one could parlay that into things like chatting with each other in Sametime Instant Messaging. Then, a week or two later, at approximately the same time as it rebranded SmartCloud to Connections Cloud, IBM rolled out a major upgrade to SmartCloud Connections. Mostly the upgrade added and improved features. It also disabled a feature. Yes, the one I described in so much detail here. The ability to publicize to other SmartCloud Organization one's Profile.

I was dismayed at first because I thought the disabling of this feature meant that I would no longer be able to work with members of other Connections Cloud organizations using the powerful features of Connections Social Cloud or of Sametime Chat. But then I noticed that I was still a member of some non-Rockteam communities and I realized that there must still be a way to enable all that. So I did some digging. And what I discovered is that now you can enable all those things without first publicizing your profile.

All you have to do is this: Invite other Connections Cloud users to join your network; or accept their invitations to join their network. The only trick is that, when you do invite another Connections Cloud user to join your network, you have to use that person's Connections Cloud email address. Having done that (invited/accepted), the two of you can now work, er, collaborate with each other using all of the following Connections Cloud features:
  • Each can see the other's full profile. 
  • Each can see what other network contacts both have in common.
  • Each can see what communities both belong to, and can invite the other to join communities.
  • Each can add the other to his/her Sametime contact list, see the other's presence icon in the contact list, and chat the other up when the other also shows as present.
  • Each can share files with the other and see a list of files the other has shared with him/her or made visible to his/her organization.
  • Each can participate in activities with the other.
  • Each can invite the other to meetings.
  • Each can sever the network relationship at any time.
It's true that some of these benefits are available between Connections Cloud users and non-users, who you invite not to join your network, but rather to be guests in specific communities. But others, such as Sametime chatting, are only available within one's own organization or between networked SmartCloud users. As a Connections Cloud user who receives services from and provides services to other Connections Cloud users, I like this feature a lot.

Saturday, July 19, 2014

How to force iNotes into Full Mode on a tablet computer

With IBM Notes Traveler and IBM Connections apps available for mobile devices, it's not all that often anymore that I try to get into IBM SmartCloud from a browser, especially on my phone, where the form factor is just too, too small. But on a tablet like the iPad it's still useful sometimes. Of course, when I do, if I try to look at my mail, calendar, or contacts, it defaults to displaying them in the iNotes UltraLight interface. That's fine most of the time and it's perfect for a phone with its, again, small screen. But a tablet's screen is big enough to accommodate the iNotes Full interface. And sometimes I wish I could switch over to it. Don't get me wrong. I think the iNotes UltraLight interface is brilliant. But sometimes it's just too minimalist.

iNotes UltraLight interface
IBM SmartCloud displays iNotes UltraLight mail interface in iPad's browser
 A few years ago I decided to go to Lotusphere without a laptop computer in tow. Having bought and fallen in love with an iPad I thought I'd try surviving a week that year with just the iPad, my iPhone and the laptops they provide at Lotusphere. And I managed just fine, but I wished I could bring up iNotes on the iPad in Full interface mode. Lotusphere was (and its successor Connect is) about the greatest place in the world to have such a wish because you can just go to any of the labs and talk to IBM's own experts on any subject. I did just that and the guys in the lab helped me figure out how to force iNotes into Full mode. We bookmarked it in Safari, I thanked them, and I went on my way (while, behind me I heard one of them say to another, "See, I told you people would want to use this stuff on an iPad".)

iNotes Full interface
IBM SmartCloud can display iNotes Full mail interface in iPad's browser
I went years with that bookmark on my iPad, using it less and less frequently as I got more into the Traveler/Connections app groove and out of the SmartCloud-by-browser groove. (One reason for that is that the apps offer a much better editing experience, providing, as they do, access to Apple's double-edged editing tools.) Then, just the other day, I got a question from a customer, a new Notes/iNotes/SmartCloud Connections user, wanting to know if there was a way to get the Full mail/calendar/contacts interface on a tablet. Oh, yes there is, and I know how to do it! I went looking for my bookmark and, omigod, it was gone! I don't know where it went, but I could no longer find it on my iPad.

So I had to relearn how to force Full mode on a tablet. I experimented with the URL, but the darn thing kept coming up in UltraLight mode. I Googled it, but, surprise, it doesn't seem to be a topic that has been discussed much in GoogleSpace. What the heck, I even opened a PMR with IBM SmartCloud to find out if they knew the answer. But then, impatient for them to get back to me, I went back to work on the URL and (ta da!) I cracked it.

Here's the URL that appears in the Safari browser on the iPad when you click Mail in the SmartCloud interface and brings up iNotes UltraLight (substitute your own mail path name for the zeroes, ones, and twos):
https://mail.notes.na.collabserv.com/data0/11111111/22222222.nsf/iNotes/Mail/?OpenDocument&Form=m_HomeView

Here's how I changed it to force iNotes to come up in Full mode:
https://mail.notes.na.collabserv.com/data0/11111111/22222222.nsf/iNotes/Mail/?OpenDocument&ui=inotes_full

As you can see, the key (which I had missed initially) was not to add "&ui=iNotes_Full" but rather to substitute it for "&Form=m_HomeView". And here's a plus: Once you are in Full mode, you stay in Full mode. Touching any of the mail-related links on the screen returns that screen in Full mode as well.

The next thing that happened was that I got a call-back from IBM SmartCloud Support. I told the guy I had solved the problem and he said, "Oh, really? Would you please send me the solution, so we'll have it in case anyone else ever asks?" That made my day. Well, sort of. The fact that they didn't already know the answer reminded me that this is a solution in search of a problem. A smaller and smaller problem as IBM continues to enhance its mobile Traveler and Connections apps.

But, hey, it gives me, all from within the browser interface on my iPad, access to my mail views, folders, rules, archives, and delegated mail databases, all of the calendar views, my To Dos and Notebook entries, my iNotes preferences, and even the Sidebar-base Sametime Communications widget. Caveat: Not officially supported by IBM. And not, perhaps, 100% functional. I get occasional 404 errors; but when I click OK, Safari tries again and my data finally appears. And I haven't actually tested everything, so who knows what else might break?

I'm good with that. Thank, IBM, for some great software.

Copyright 2014 Rob Kirkland

Friday, July 18, 2014

Set Up your SmartCloud Meetings meeting room in the SmartCloud calendar

I am an IBM SmartCloud Notes and IBM SmartCloud Meetings user who works mostly remotely from my colleagues and customers. Therefore, when I create meeting invitations in Notes or iNotes, I like to add my SmartCloud Meetings meeting room and call-in information to virtually all of my meeting invitations. In fact, I do it even for face-to-face meetings because these days you just can't assume that nobody will want to attend remotely.

Including meeting room and call-in information in a meeting invitation is one-click easy. Well, almost. I have had new SmartCloud users try it and fail, then ask me how I do it. Their problem turns out to be that, before you can do it, you have to define a meeting room. 

The problem is that, where Sametime Meetings users are expected (and presumably taught how) to set up their own meeting rooms, SmartCloud Meetings users have a meeting room predefined for them and are expected to use that one meeting room exclusively. So nobody teaches them how to define a meeting room. After all, if their meeting room is predefined, they don't need to define one, right? 

 Er, wrong. When new SmartCloud Notes or iNotes users try to include meeting room information in a meeting invitation, they are presented with an empty list of meetings, as illustrated below, and no information as to what they should do about it. Where is their predefined meeting room?
Because it's the only available option, they try clicking New, which brings up the form below, which presents two problems:
  • It prompts them for the Meeting URL, which they don't know how to provide. 
  • It does not prompt them for the Meeting ID, which they also need and also don't know how to provide.
What nobody tells the new user is: 
  • That one needs to gather the information for this screen beforehand; and
  • Where to get this information.
And there's another problem. If the user tries to navigate directly between the meeting invitation screen and the screen where the meeting information appears, the one screen closes before the other one opens. The user needs to navigate in such a way that both screens remain open so that she can easily copy/paste the information. In other words, the user needs to open the meetings dashboard in one tab or browser window and the calendar app in another.

Here is what the user can do to easily gather the needed information and use it to create a meeting room:
  1. Log into IBM SmartCloud, then navigate to the SmartCloud Meetings dashboard. (Click Apps, Meetings (New) in the Ribbon or, if your organization is "newish" to SmartCloud, it might just say "Meetings".) 
  2. There one sees that a meeting room has indeed been predefined. There, too, are the Meeting ID and Meeting URL.
  3. Optionally (but recommended), set a password for the predefined meeting room.
  4. Leave the Meetings dashboard screen open while you open a meeting invitation. Do this as follows: 
    1. Click the IBM SmartCloud for Social Business tab in the browser to open the original SmartCloud landing page. Or open a new browser window and connect to SmartCloud again from that window.
    2. Then click the "Sign in" link again to open SmartCloud again in yet another tab or window. Result: Three browser tabs and/or windows are open: The SmartCloud landing page, the Meetings page, and the user's Home page. The user can now copy/paste between screens.
  5. Under this new browser tab or window, navigate back to the iNotes calendar and create a new meeting invitation. There, click the links again to return to the New Online Meeting dialog. Now do the following:
    1. Change "Select service" to "IBM SmartCloud Meetings". This causes an additional field (Meeting ID) to appear in the form.
    2. In "Meeting room name", enter any name you want for your meeting room.
    3. In "Meeting URL", paste the URL from the "Your meeting link" field on the Meetings dashboard (under the Meetings browser tab).
    4. In "Meeting ID", paste the eight-digit number from the "Meeting ID" field on the Meetings dashboard.
    5. In "Password" enter or paste the meeting room password if you set one.
    6. In "Call-in information" enter the dialing information to access your bridge or conference line. If one has to dial a phone number followed later by another number, such as a PIN, a conference bridge or an extension, separate the two sequences with either one or more commas (",") or a semi-colon (";"). If the last set of numbers requires a pound symbol ("#") at the end, add it here. That way the invitee doesn't have to dial it manually at meeting time.
      1. Each comma inserts a two-second pause into the dialing sequence. One comma is usually sufficient, but you can insert more than one for a longer pause. 
      2. A semi-colon inserts a "wait", where the numbers following the semi-colon aren't dialed until you manually tell the phone to dial them. 
      3. On smartphones a soft button typically appears on-screen that, when touched, initiates the waiting number sequence. 
    7. The completed dialog looks similar to this:
    8. Click OK. The newly defined meeting room appears in the list. It is selected. Details about it appear in the bottom portion of the dialog.
    9. Click OK to close the dialog. The meeting room and call-in information appear in the meeting invitation.
  6. Either complete or cancel the meeting invitation. You're finished.
From now on, the newly defined meeting room will appear in the list, preselected, in the Reserve Meeting Room dialog, and you can just click Online Meeting, then OK, to include its information in a meeting invitation. 

For some meetings you don't really need a meeting room; rather, all you need is call-in information. Here is how to set up your call-in information in SmartCloud so you can insert it into meeting invitations with a single mouse click:
  1. Log into SmartCloud and open your mail or calendar window. If you are already logged into SmartCloud and you have open tabs that have unsaved edits, save them before you proceed further, because when you save your preferences in step 5 below, all open tabs will close and unsaved edits will be discarded.
  2. Click More in the Mail or Calendar Taskbar, then click Preferences. The Preferences page will appear under another tab in the mail or calendar window.
  3. In the navigation (left) pane of the Preferences page, expand Calendar, then select Meeting. The contents of the main (right) pane will change accordingly.
  4. Under Conference Call Information enter your calling number. Use commas (",") to introduce two-second delays or semi-colons (";") to introduce waits, as previously described.
  5. Click Save and Close. Click OK in the warning dialog that appears. All SmartCloud tabs will close, then the Mail or Calendar tab from which you initiated the above steps will reopen.
Now, whenever you create a meeting, you can add your call-in information by clicking the "Call-in Number" link in iNotes or checking the "Include conference call information in the Location" checkbox in Notes.
Copyright 2014 Rob Kirkland, Rockteam

Thursday, July 17, 2014

How to enter a conference call phone number into a meeting invitation

I love my iPhone. I love that I can open meeting invitations on it and that the meeting phone number is recognized and highlighted, so that, if I touch it, the iPhone dials it for me. I love it even more if the meeting organizer entered the next bit of information correctly. That would be the conference access code. If entered correctly, the iPhone either pauses for a couple seconds, then dials it, or the iPhone displays a button (or maybe just the words - depends on the iOS version) that says “Dial xxxxxxx#” (where “xxxxxxx#” is the conference access code, which in this example ends with the pound/hash sign).
Trouble is, many users don’t know how to enter the phone information so that the iPhone (and probably the Android, too) will work this way. The way you do it is like one of these:
nnnnnnnnnn,xxxxxxx#
or
nnnnnnnnnn;xxxxxxx#
The n’s are the phone number. The x’s are the conference access code. In the first example, they are separated by a comma, which causes the phone to pause two seconds, then continue with the next string of numerals. In the second example, they are separated by a semicolon, which causes the phone to pause until you signal it to continue, which you do, on my iPhone, by touching the words “Dial xxxxxxx#”.
This works with extensions too. And it works with successive strings. For example, someone the other day told me that his phone number was (xxx)xxx-xxxx, then dial 8, then dial 123. In my contact record for him, I entered this: (xxx)xxx-xxxx,8,123
Here’s what people do that I hate, In the meeting invitation, they (oh, so helpfully) enter this sort of thing:
Conference Dial-in Number: (xxx)xxx-xxxxParticipant Access Code: xxxxxxx#
Now, when I want to dial in, I have to do one of the following:
  • Write down the access code, then dial in, then manually enter the access code.
  • Memorize the access code, then dial in, then manually enter the access code.
  • Dial in, go back to the calendar app and look at the access code, memorize it or write it down, then return to the phone app and manually enter the access code.
This is a drag.
Not helpful.
No thanks.
The next time someone does this to you, send them the URL to this blog post.

Sunday, October 14, 2012

How to turn a Notes View into a Widget: It's easy, but not always as easy as you may think.


The other day IBM Tech Support showed me a cool, maybe undocumented feature of Notes 8.5.x. The following day I discovered a useful application of the feature. For my reader who doesn't have time to read my witty and snappily written (but, okay, long-winded) prose below, the short (two-sentence) version of this post is (so as not to spoil it for my other reader) at the very end of this post.

You may know that the personal productivity Notes apps (mail, calendar, to-do, contacts, notebook) are composite apps. That means the pieces of them that appear on screen (navigation pane, views, forms) are written as "components" that  can be rearranged on screen and wired up to work with each other in custom ways using the Composite Application Editor. The Composite App Editor is available (if installed) when a composite app is open on screen. Get to it in the Actions menu by clicking Edit Application. One of the nice aspects of composite apps is that they aren't confined to running in Notes. Each component can potentially be combined with any other component (whether originally intended ro work together or not) and can be run in other Eclipse-based containers or in WebSphere Portal.

All this only works in Notes when it is running in Standard Mode. In Basic Mode, these apps are plain old Notes apps, like any other. That means, of course, that much of the code underlying the new functionality is written in Java. And when something goes wrong in Notes these days, it's almost always a Java-driven piece of the product that goes haywire. (The C++ code, having been around and debugged since the beginning of time, is pretty rock solid in Notes. The Java code, into which Notes was cradled starting in version 8.0, has a way to go before the significant bugs get worked out of it.)

Anyway, I was on the phone with IBM Tech Support (a great, extremely helpful bunch of people, by the way) and we needed to know if a problem we were troubleshooting was in the Java or C++ portion of the product. To find out, we had to go to Basic Mode. If the problem continued to rear its ugly head, we would know to look for it not in the Java code but on the C++ side. Normally, you get into Basic Mode by restarting Notes, appending either the -sa or -basic command line argument. (I guess nobody (including me) could remember "-sa" (because, like, who knows what "sa" stands for?), so later they added "-basic". Thank you, IBM, very much.)

Restart Notes, kind of a hassle. But the Tech Support guy clued me in to a neat trick. Instead of restarting all of Notes, you can leave Notes running in Standard Mode and just start an individual application in Basic Mode by holding down Ctrl+Alt while clicking the app in the Start List. Whoa! Too Cool! (I'm pretty geeky. This made my day.)

So, we did that and, of course, the problem disappeared. Like I said, Notes problems these days occur in the Java code, not the rock solid C++ code. End of that story.

The following day I discovered how this trick could come in handy with respect to Widgets, yet another nice, Java-based feature that appeared in Notes in, er, Notes 8.0.1, I think. The Widget app is a Notes Sidebar app. Non-running widgets appear there as tiles or in a list. When you run a widget, it opens in one of several places: in the Sidebar, in a tab on the main portion of the Notes app, or in its own window. Nice versatility, that. One of the sweet, stupidly easy things you can do with Widgets is turn any Notes view into a widget. (Well, almost any view - keep reading)

I had been having a dialog with my friend Dan about some Notes limitations that he had been experiencing. He had been getting pretty fed up by Notes and was saying things like "Notes has a really crappy search tool" and "Notes isn't very customizable", to which, to his surprise, I answered "Are you kidding? Notes has great search functionality" and "Are you kidding? Note is fabulously customizable."

One of the things Dan complained about was that the scrolling was way too slow when he wanted to file an email. It turns out I couldn't help him speed up the scrolling. It's a known issue when a Notes Mail database (running in Standard Mode) has more than, say, 200-250 folders, that scrolling slo-o-ws down. So, as a workaround, Dan wanted to close the mini-view window in the lower left of his Notes screen, so that he could maximize his folder pane to reveal more of his (insanely huge number of) folders. But he also uses the Follow Up mini view to keep track of things he needs to get done. So I pointed out that he could use the regular follow-up view. To which he replied that he needs it visible all the time, not hidden amongst the tabbed views.

That's when it occurred to me that he could turn the Follow Up view (the big one, not the mini-view) into a widget. And that's when I discovered that NOT all views can become widgets with stupid ease. Views configured as Components cannot be easily turned into standalone widgets. And that's when I realized that the Ctrl+Alt trick might come in handy.

Okay, so I wanted to turn Dan's Follow Up view into a widget that could appear in his right sidebar OR in a little window anywhere on his screen that suited Dan. When I say "stupidly easy", here's what I mean: To turn a Notes view into a widget, you open the view, click the "Configure a widget from Current Context" icon in the Toolbar (or use the menu), select "Open this view", and click OK.

(Life will never get easier than that. When it does, it will be because I, Robot, am running things now and you humans can just sit back and suck your thumbs.)

But when I tried to make a widget out of the Follow Up view, the dialog box didn't offer to "Open this view". Instead, I could "Just configure a widget for now" or "Wire as an action". Neither option actually caused the view to appear in a widget window. Arrgh! I had to scratch my head for awhile before I realized why. Luckily, the cause and solution dawned on me before the headscratching drew blood from my thinning scalp.

In a Composite App such as Notes Mail, views are not really views like they are in regular Notes apps. They are Components. Because I was trying to turn a Component into a widget, I was getting a whole other, not very useful set of choices than I expected.

But, wait! What if I open Notes Mail in Basic Mode? Would I be able to turn the Follow Up view into a widget then? The answer, to make this long story less long, is YES. Worked like a charm.

So, to recap:

  1. You can open a composite app like Notes Mail in Basic Mode when Notes is still running in Standard Mode by pressing Ctrl+Alt while clicking the app's link in the Open List.
  2. You can turn a view in a composite app like Notes Mail into a widget by first opening the app in Basic Mode as in #1, then clicking the "Configure a Widget from Current Context" icon in the Toolbar, selecting "Open this view", and clicking OK.

Pretty cool, nay?